
The versatility of hydraulic excavators is virtually unmatched in the world of construction equipment. Whether you’re talking about compact, mid-range or large hydraulic excavators, these machines are ideal for lifting, moving and placing a wide range of materials. As a result, it is important that hydraulic excavator operators are trained to properly lift loads or materials.
Learn the Fundamentals
The rated lifting capacity of any hydraulic excavator is determined by two factors: hydraulic lift capacity and the tipping load. Hydraulic lift capacity is the point at which the excavator is limited by its hydraulic power to lift a load. Tipping load is the point at which the excavator begins to tip or lift off the ground when lifting a load.
Manufacturers conduct tests according to ISO 10567 standards to determine how much weight the operator of the excavator can lift and swing at various heights and distances from the centerline of the machine. Based on these tests, manufacturers develop lift-capacity, or load-rating, charts, which are provided in the machine’s operation and maintenance manual or cabin area for operator reference.
It’s important to know how to read and understand an excavator lift chart. Tom Connor, Bobcat Company excavator product specialist, points out that charts for compact excavators contain information indicating the machine’s standard configuration. He cautions operators to factor in any lifting considerations that result from additional accessories or attachment variations, as these alternative items can reduce a machine’s effective lifting capacity. For instance, the weight of slings, any auxiliary lifting device and the weight difference of any attachment heavier than the standard configuration must be subtracted from the rated lift capacity to determine the correct net lift capacity.
There may be several lift charts for a large or mid-range excavator, based on combinations of boom length, arm length, bucket size, counterweight size and track shoe width. According to Mike Stark, Doosan excavator product specialist, operators need to pay specific attention to whether the bucket weight is incorporated into the lift chart. This varies by manufacturer and can affect the operator’s ability to determine the lift accurately because the bucket in use may not match the bucket weight used for the lift chart.
In the following lift chart, for instance, rated loads marked with an asterisk are limited by the machine’s hydraulic capacity and do not exceed 87 percent of hydraulic lift capacity as tested. Rated loads without an asterisk are limited by the machine’s stability, or tipping capacity, and do not exceed 75 percent of the tipping load as tested.
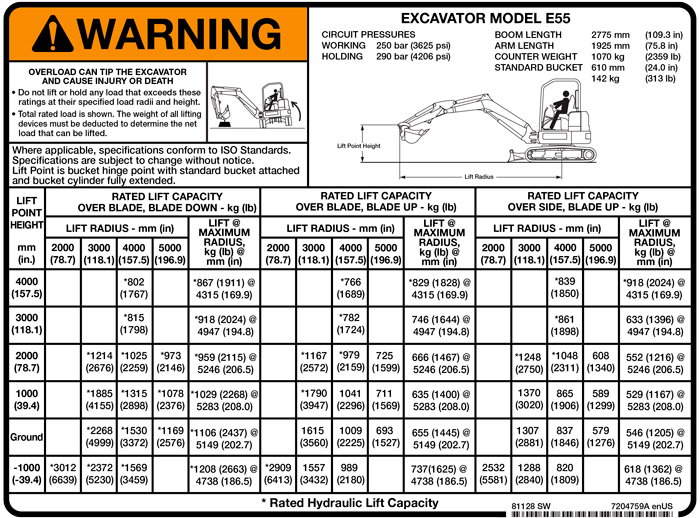
The next thing you need to determine is the lift point height, which is in the far-left designated lift point in the lift chart in Figure 1. This is not the distance from the ground to the object you’re lifting. When you’re measuring the lift point height, consider how high you will need to lift the load, including the height of the load itself, the length of the lifting device (such as a chain or sling) and the height you want to place the load (such as a trailer).
Determine the lifting radius from the centerline of the swing point. This distance is shown in the top row of the lift chart. Additionally, if you are using an excavator with a dozer blade or outriggers, you need to reference the portion of the lift chart that reflects its position during excavation.
Next, find the cell on the lift chart where the lift point height and lifting radius intersect. The number shown is the excavator’s rated lift capacity in pounds or kilograms. If the cell is blank, the excavator has no lifting capacity at that point, and lifting should not be attempted.
Generally, as you move to the right on a lift chart, lifting capacity will decline. Also, when lifting over the side of the excavator, the rated lifting capacity is often lower than it is over the front of the excavator.
Jobsite Considerations
Other jobsite factors that operators need to be aware of when lifting with an excavator include the following: the operating condition of the excavator, the strength of the supporting surfaces beneath the excavator, obstructions around the jobsite, proper movement with the load suspended and weather conditions.
Lifting checklist
- The excavator should always be on a firm, level and uniformly supportive surface. Do not attempt to lift on soft or uneven ground or slopes. Use the manufacturer’s designated lifting points.
- The excavator should not be modified or altered in any way and should be properly maintained.
- Always lift squarely over the side or front of the machine. If equipped, activate the lifting mode control on the excavator before using the machine for lifting. Keep the load as low and balanced as conditions will permit, and swing the load slowly and smoothly.
- Keep bystanders away, and never swing loads over other personnel or equipment.
- If the surface area of the load is large enough, unexpected wind gusts can create excessive side load conditions. Tag lines held by workers on opposite sides of the load can help control the load and prevent side loading caused by wind gusts.
- Keep the designated lift point directly over the load. The load can become unbalanced if the line is twisted and starts to rotate. Use short slings to prevent excessive load swings and swaying.
- Always try to keep the lifting eye straight below the centerline of the arm and bucket pin. This allows the weight of the load to be supported primarily by the pin and not by the bucket cylinder, link and link pins.
- Always check for overhead restrictions such as power lines and structures.
Finally, if you have any questions, always consult the excavator’s operation and maintenance manual.